Seven Deadly Exposure Blending Mistakes
Which one of these deadly Photoshop sins do you want to fix today?
 Hey, Steve here from Post Processing Mastery
When I edit my landscapes and blend exposures, I like everything to look as natural as possible.
If like me, you want the same thing then this means making sure your exposure blending goes unnoticed.
Because you don’t want the first thing people notice about your image to be how “Photoshopped” it is.
And when it comes to exposure blending…
…a lot can go wrong
And when it does, boy does it stand out!
So I’ve put together this list of 7 of the most common mistakes you should avoid when blending exposures in Photoshop.
Are you making any of these 7 critical mistakes?
Mistake #1 – Over-blending
Here’s what I mean.
One way to shoot and process bracketed exposures is to take one shot for the sky, one for the foreground, and then blend them together in Photoshop.
Simple, right?
But the mistake which happens all too often (and yes, I’ve been guilty of this myself in the past!) is to mess up the balance between what should be bright and what should be dark.
The sky (which really was the brightest part of the scene) ends up being made darker than the foreground (which was really the darkest part).
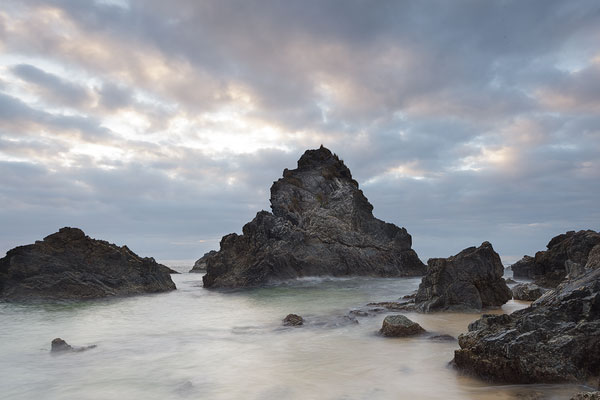
Here’s an example of over-blending:
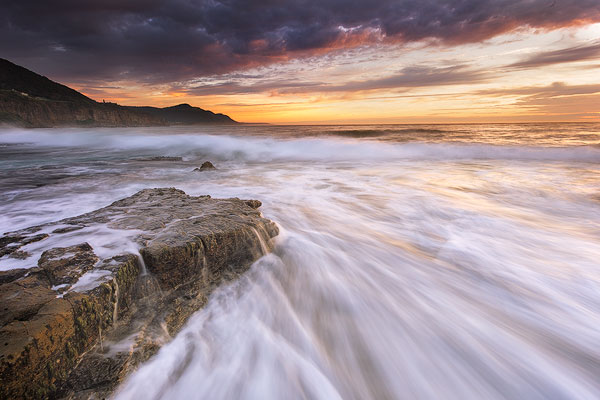
Sometimes thick cloud can appear darker than the foreground when there's a gap which allows the light to shine on the foreground. But in this example, if you're going for a natural result then there's no way the bright part of the sky should be darker than the thing that it's illuminating (ie. the water). One way to easily detect if you're accidentally over-blending exposures is to zoom all the way out in PS to view the image small (like, thumbnail small).
Mistake #2 – Making Halos
A halo is normally considered a good thing, right?
But when blending exposures in Photoshop halos are one of the worst things ever (and the easiest thing to get wrong!)
It happens most when you’re using a brush in a layer mask to reveal (or conceal) part of a layer, but the brush kinda “paints over the lines”.
Like this:
I've exaggerated the effect here to make sure you see exactly what I mean… This image shows what happens when you paint over the edges of the rock when you're trying to blend a brighter version of it in from another layer.
You can stop this to a degree by being super-careful and accurate with your brush strokes and just being aware of the potential for halos to start appearing at any time.
But the best way to prevent halos is to get a little more advanced with your masking techniques.
(Folks who have purchased my Luminosity Masking Mastery course in the past will know the power of that particular technique for eradicating halos from their images!)
Mistake #3 – Moving objects
Stuff moves. And when it moves in between shooting your first and last exposure, you’re gonna need to keep it in mind when blending them together in Photoshop.
When shooting landscapes this will include things like clouds, trees, grass, water etc.
If an object has moved too much between your exposures and you blend them together, you’re going to end up with a blurry mess.
Trees and grasses etc are the worst for this, whereas water and cloud movement is a bit more forgiving (especially if you’re shooting long exposures).
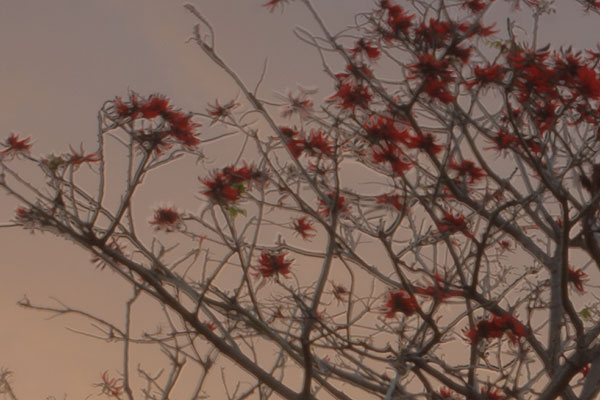
Here’s an example of a blend that would NEVER have worked:
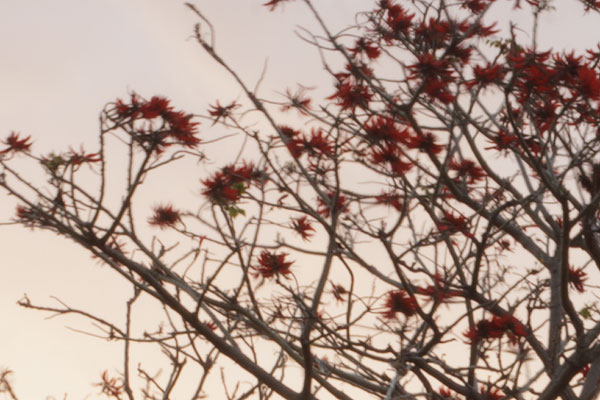
The original plan was to use this brighter exposure of the tree and blend it into a darker sky. However, you can already see the movement in the branches caused by the long exposure just in this single frame. Take a look below to see what a nightmare it would have caused if I actually had attempted a blend!
And here's the disaster of a result! This is what happens when you try to blend a moving tree across two exposures! Now, some HDR plugins do have a “remove ghosting” feature which can help reduce this type of problem. But only really when there is the very slightest of movements. Blending these two exposures would never work.
For this image, I had to completely scrap one of my three exposures because it would never have blended. Nothing lined up because the tree was moving in the wind.
The fix was to create a “faked” bracketed exposure and use that instead…
If you’re wondering what a faked bracketed exposure is, then read the solution to mistake number 4 next…
Mistake #4 – Not starting with enough exposures
When you’re out shooting, the higher the amount of contrast that exists between the brightest and the darkest parts of your scene, the more exposures you’re going to want to shoot.
The mistake here is to assume that there is a rule to how many exposures you need.
For example, one very common piece of advice is to shoot three exposures, each one two stops apart.
But sometimes this isn’t enough and you’ll end up not capturing the entire dynamic range of the scene.
The result: blown-out highlights or lost detail in shadows – even though you’ve blended what you were told was the right number of exposures!
My advice here is to go beyond the limits set by your camera’s bracketing feature, shoot in manual so that you can capture the full dynamic range – no matter how many individual exposures this ends up being.
Mistake #5 – Over-editing before you blend
You will need to do some file preparation in Camera RAW to prime your images for being blended (as I describe in my workflow videos), but you don’t want to overdo it at this stage.
Besides the most basic edits (like lens correction, white balance and a few others), the actual process of blending exposures needs to be done right near the top of your workflow.
If you’re a Lightroom user, this means not getting “creative” at all before opening the images up in Photoshop.
Because you may make some edits to so that your darker shots look good, then also edit your lighter shots to look good…
But what looks good separately won’t always look good when put together and it can actually make the process of blending your exposures more difficult than it should be.
Mistake #6 – Washing away all your contrast
Out of the 7 mistakes I’m listing here, this one has the biggest potential to turn your photos to mush.
And it’s also the most difficult to detect if you’re doing it or not.
Think back to Mistake #1 where I told you about over-blending, which is where you make the dark bits too bright and the bright bits too dark so that the contrast is reversed.
Well, Mistake #6 happens when you blend everything together so “effectively” that you’ve made everything the same brightness, eliminating ALL contrast.
And when you do this on a small detailed level it can be hard to detect until it’s too late.
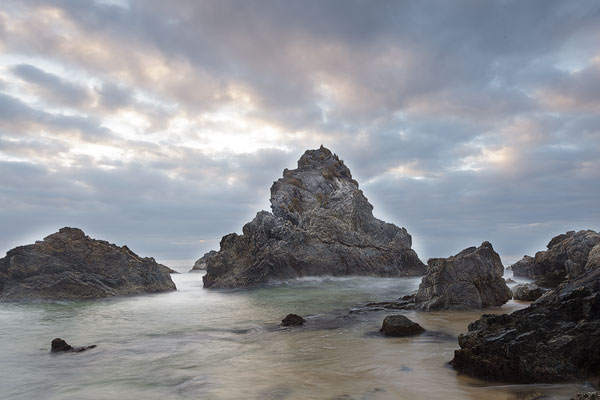
Here’s what I mean:

Notice all the nice detail in the rock on the left, which is the original “bright” exposure.
In this example, I blended it with a dark exposure to recover highlight detail in the sky and clouds. But as a result, lots of the contrast in the rock has been lost leaving it all “mushy”.
Again, I've over-exaggerated the effect here just to make the point, but hopefully this now helps you know what to be on the lookout for!
Mistake #7 – Toasting the tops of mountains (and other objects)
I saved this one til last cos it’s my absolute biggest pet peeve (actually more than a peeve, it really grinds my gears!!)
Toasting the tops of mountains and other objects.
It’s kinda the opposite of creating halos, but this one tends to go un-noticed compared to halos for some reason.
Caused by inaccurate brush strokes when blending (or even worse, an over-eager automated HDR plugin or application).
Here’s an example:
Notice the burned edges of the rocks in this example. This is a result of being “over careful” not to create halos when blending a brighter rock with the darker sky.
Just like halos, you can fix this to some extent by just being aware of it and being SUPER careful with your basic brush strokes in your layer masks.
But the best way to ensure you don’t have this cropping up in your images is to start making more detailed and intelligent layer masks (by using luminosity selections when creating your masks).
Here’s how to make sure you don’t make these 7 mistakes in Photoshop
Now that you're aware of these 7 mistakes, just keep them in mind next time you’re blending exposures in Photoshop and you'll give yourself a good chance of not making them again.
Because now you know what to look for and to find a solution.
But if you want a closer step by step look at the advanced masking techniques that will not only ensure you don’t make these mistakes again, but which will also give the quality of your Landscape work in Photoshop a boost – then you might want to think about picking up a copy of my Luminosity Masking Mastery video course.
So what do I do next?
If you’re really ready to discover what mastering luminosity masking will do for the quality of your images then just click the link below and find out on the next page: