
Ever noticed halos appearing around objects in your images when you're blending exposures or masking an adjustment in Photoshop?
Here's an example:
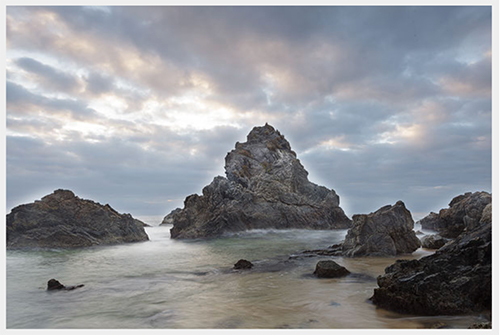
It's a result of painting over the lines in your layer mask.
(Or not painting up close enough to the lines)
Say you add a curves adjustment that darkens your image, but you don't want it to darken something that's already dark (like the rock in my example above).
So you take a black brush to the curves' layer mask to conceal it's effect from the rock.
Only, the rock has a jagged edge and you can't seem to brush right up to the edge without spilling over into the sky…
So you either hold back from the edge a little bit (causing a reverse-halo where the edge of the rock stays dark), or you brush over the edge making the sky too bright, thereby causing the halo effect.
In theory you could zoom in to 200-300% on your image and apply the brush to the layer mask on a pixel by pixel basis for accuracy.
Whilst possible, it would take an incredible amount of time to do very well.
And that would be just for one layer or adjustment.
If you want to avoid halos and not spend a lifetime processing and blending each image, there is a better way.
Luminosity masking is the perfect combination of accuracy and efficiency.
Now, the time you spend on this will be front-loaded.
Meaning, it will take a little while to learn the techniques up front.
But once you know them, it will make all your manual exposure blending quicker and more accurate than ever before from that point forward.
I'll even go as far as to say that once you've got a good amount practice under your belt, it's actually just as quick (if not quicker) to get a great result than using an automated exposure blending plugin.
If you want to take the next step by learning these important Photoshop techniques, click here now.
Talk soon,
Steve
FREE GUIDE: An Introduction To Luminosity Masking

Download the FREE PDF Guide Now so you can instantly see the difference that Luminosity Masking will make to your Landscape photos.
Just enter your FIRST NAME and your PRIMARY EMAIL Address below to subscribe to our emails so we can send you the download link: