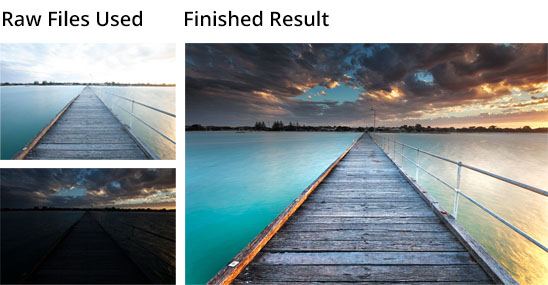
“How To Transform Dull, Lifeless RAW Files Into A Stunning Natural-Looking Landscape Every Time Using These Simple Photoshop Techniques”
[threecol_two]
 [/threecol_two] [threecol_one_last]
[/threecol_one_last] [divider]
The secret behind processing consistently high-quality landscapes in Photoshop:
If you're not getting the results you want out of photoshop, then it's probably because you don't have a solid and consistent workflow. But don't worry, it's not your fault and I'm about to give you the 6 steps that you can follow for awesome results:
Step 1: RAW file preparation
Before you start to process your photo at all, you need to “prep” your RAW file to get it into the best possible state that is primed for being edited. Importing your RAW file into Adobe Camera RAW, you'll want to make some standard adjustments to achieve this
- Remove all sharpening
- Add noise reduction where appropriate
- Correct the white balance
- Remove lens distortion
- Set the correct camera profile
Step 2: Even out your exposure
This stage of the workflow is all about creating an even exposure. Increase the brightness of your shadows, tame any highlights that are too bright etc. If you are blending multiple exposures then this is when you'd do it. Otherwise, you can use standard Photoshop adjustments or use the Shadow and Highlights sliders in ACR. You want to aim for creating quite a flat, low-ish contrast image here. A blank canvas if you will. Something that is ready to accept the contrast adjustments that we are going to apply in stage 4.
Step 3: Colour correction & calibration
This third stage is when you want to make sure your colours are correct. Or if you want to get creative with the colours in the image, you can do that here too. One simple and effective way to achieve this is to use the Curves adjustment layer and either use the eye-dropper tools to automatically correct and remove any unwanted colour casts, or you can manually adjust the curve for each colour channel to get the effect you want.
Step 4: Add contrast and drama
Step 4 is where things get fun and your image will start to really take off. You can use any method you like here, but I like to use simple Levels adjustment layers to increase the contrast in certain areas of the image individually, using layer masks to control where each layers' effect is applied. A by-product of adding contrast using the levels adjustment layer is that it really boosts the colours, making them rich and exciting. If you want to use any other methods to boost and enhance the colours you established in stage 3, then do that now.
Step 5: Enhance and embellish
The majority of the “big edits” have been done by now. Step 5 is where you can make all those tiny micro adjustments to your image that seem small in themselves, but when compounded really give your image a finished and professional look. Things like, dodging and burning to enhance contrast within individual objects, or to control the overall lighting of the shot. Or cloning out small unwanted objects in the scene. These can all be done now, after the “big stuff” in step 4.
Step 6: Resize, sharpen and export
The final step is to simply resize, sharpen and export your image for the desired output, be it for web, print, or any other purpose. My favourite sharpening tool is the Smart Sharpen filter so I recommend you use this, but after you have resized your photo to the desired pixel dimensions. Always save a master copy of your PSD so that you can come back and make any changes to your file later on. Use the “Save for Web” option to create a copy in JPEG or PNG format.
If you want to learn more…
If you follow this simple formula when processing your landscape photos in Photoshop, you'll end up with consistent quality in all your shots. But this article is only the tip of the iceberg…
Imagine if I showed you the entire process step-by-step in a 1 hour long video series…
Well – ask and you shall receive… Enter your name and email at the top of this page and I'll send you the videos that show you EXACTLY how to do what I've described here.