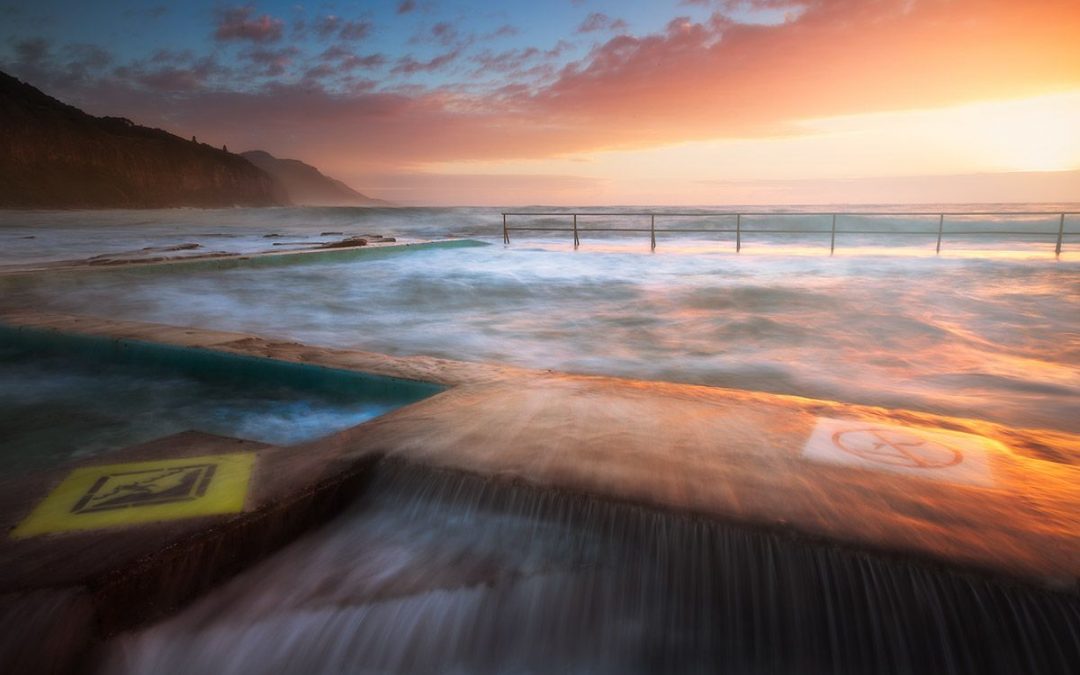
You might recognise this pool from a photo I shared a while ago, taken at my local-ish beach at Coalcliff a while back…
On a high tide with a decent swell, waves crash into the pool and water cascades prettily over the edges. With a longish exposure (1.6 seconds for this shot, to be exact) you can capture that movement and give it a silky flowing effect like you see in the foreground here.
It kinda demonstrates in a single shot, the point I was making a few days ago about the “best shutter speed for moving water”.
What I said then was that the faster water moves across your frame, the shorter shutter speed you’ll need to capture it’s movement. And on the flip side, the slower the water moves across your frame, the longer shutter speed you’ll need.
And part of that equation is how far away the water is from your lens.
So take this image as an example.
The cascading water in the foreground is moving about a quarter of the height of the image during the exposure.
The water in the pool is sloshing around, possibly moving the same actual distance as the foreground water, but in relation to the frame of my photo, it’s only covering a fraction of the distance.
Then the water off in the distance almost looks sharp as if no long exposure has been used because the water is hardly moving in relation to the frame of the photo. But those waves are moving at speed!
(For reference, the guard rail is probably around 10-15 meters away, whereas the water in the foreground is in the 1-2 meter range. The waves in the distance could be 50-100 meters (from memory).)
Processing this image had it’s challenges.
It was a single exposure (for some reason I didn’t take a second exposure for the sky) so the brightest part of the sky was a bit blown out.
I had to fill a little bit of the sky back in manually, whilst keeping the blown out part still bright, to keep it consistent.
Creatively, I went for a hazy morning glow across the pool.
Also I darkened some of the edges a little to draw the focus towards the middle because the RAW file was actually really flat, exposure-wise, and the edges were quite busy so became a distraction.
Here’s what the RAW file looked like, for reference:
To master the workflow and techniques that make this kind of processing in Photoshop possible, check this out now.
Speak soon,
Steve
FREE GUIDE: An Introduction To Luminosity Masking

Download the FREE PDF Guide Now so you can instantly see the difference that Luminosity Masking will make to your Landscape photos.
Just enter your FIRST NAME and your PRIMARY EMAIL Address below to subscribe to our emails so we can send you the download link: